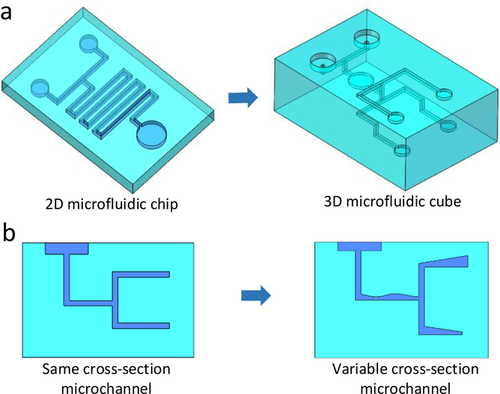
Microfluidics has revolutionized various fields, from biomedical research to chemical analysis. With the rise of 3D printing, researchers and engineers can now design and fabricate complex microfluidic devices with unprecedented flexibility. Multilevel 3D-printed microfluidic device offer several advantages:
- Compact and Efficient Designs – Stacking multiple fluidic layers saves space and allows for more intricate flow patterns.
- Improved Functionality – Different layers can handle separate functions such as fluid mixing, reaction chambers, or detection zones.
- Rapid Prototyping – 3D printing enables fast iteration and testing of microfluidic concepts.
Now, let’s dive into how you can design your own multilevel microfluidic device using FLUI’DEVICE, a powerful web-based design tool for microfluidics.
Developments of 3D Printing Microfluidics and Applications in Chemistry and Biology: a Review
Yong He, Yan Wu, Jian-zhong Fu, Qing Gao, Jing-jiang Qiu
Step-by-Step Guide to Designing a Multilevel 3D-printed microfluidic device
Step 1: Prerequisites
Before starting, if you are new to FLUI’DEVICE, we recommend checking the basic tutorial to familiarize yourself with the interface and core features.
Step 2: Creating and Managing Levels
To build a multilevel device, you need to define different levels in your design. Here’s how:
- Locate the Level Panel – On the top-right of your screen, click on “Level 1.”
- Create Multiple Levels – You can add new levels, rename them, delete them, and adjust their heights.
- Assign Blocks to Levels – Once you select a level, every new block you create will be placed on that layer.
- Switch Between Levels – Adapt your design by navigating between different layers.
Managing layers properly ensures a well-structured, functional device.
Step 3: Modifying Block Levels
- When selecting a block, you can adjust its level in the left-hand settings panel.
Keep in mind that blocks on different levels cannot be directly connected or snapped together.
Step 4: Connecting Components Across Levels
In a multilevel device, connecting channels across layers is crucial. Since standard blocks cannot snap together between levels, FLUI’DEVICE offers specialized components for vertical integration:
- Vertical Bridges – Connect two layers with a straight passage.
- Slide Bridges – Creates a sloped transition between layers.
- Custom Level Adjustments – Modify the height of multilevel blocks to span across different levels (e.g., from Level 1 to Level 3).
By using these tools, you can create seamless interconnections between fluidic pathways.
Step 5: Finalizing and Exporting for 3D Printing
Once your design is complete:
- Go to the Assembly Tab – Add necessary connectors to your design.
- Add your connectors and adjust your parameters – Choose your connectors and adjust the outlet radius, thickness of your substrate, offset, and tubing!
- Export Your Design – FLUI’DEVICE allows exporting in formats suitable for 3D printing (STL) and common microfabrication techniques (SVG & DXF).
Your multilevel microfluidic device is now ready for microfabrication!
Conclusion
Multievel 3D-printed microfluidic devices open up new possibilities for advanced lab-on-a-chip applications. By leveraging FLUI’DEVICE, you can quickly design, iterate, and manufacture custom multilevel systems tailored to your research or product development needs.